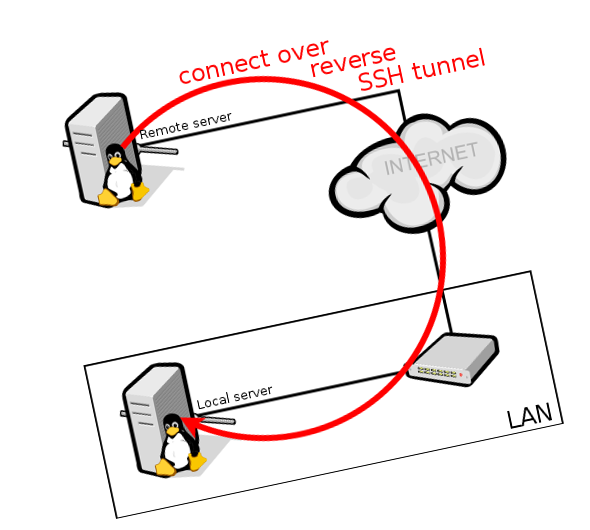
Navigating strict firewalls, carrier-grade NAT (CGNAT), or internal networks lacking a static public IP is a common infrastructure challenge. The classic answer is a Reverse SSH Tunnel—forcing a device inside the restrictive network to open an outbound connection to a public Virtual Private Server (VPS), mapping a route back to its local SSH daemon.
For years, the standard advice was to use a wrapper utility like AutoSSH to handle dropouts. However, modern OpenSSH natively handles keepalives flawlessly. When combined with native systemd service management, AutoSSH becomes redundant bloat.
Furthermore, listening on an open TCP port on your public VPS leaves your bastion host exposed to endless automated brute-force attacks. In this guide, we will build a modern, minimal, and ultra-secure reverse tunnel that drops AutoSSH entirely and utilizes UNIX Domain Sockets to hide your entry point from the public internet.
1. The Security Core: Why UNIX Sockets?
In a traditional setup, you command SSH to listen on a public port (like -R 2222:localhost:22). This exposes that port to the entire internet.
By swapping to a UNIX Domain Socket, the OpenSSH daemon on your VPS creates a virtual socket file on the filesystem (e.g., /var/run/tunnel.sock) instead of binding to a network interface.
The Security Advantages:
- Zero Public Fingerprint: Port scanners see absolutely nothing. There is no open TCP port to scan, probe, or exploit.
- OS-Level Permissions: Access to the reverse tunnel is strictly governed by standard Linux filesystem permissions. If an unauthorized user on the VPS doesn’t have read/write access to that specific socket file, they cannot talk to your internal machine.
2. Preparing the Public VPS (Bastion Host)
Before configuring the client, we must tell the VPS OpenSSH daemon how to clean up stale socket files. If a connection drops abruptly, the old socket file remains on the disk. Without adjusting your configuration, the next connection attempt will fail because the filename is already taken. Furthermore, a permission mask can be added to govern access with standard Linux filesystem permissions.
Open your SSH configuration on the VPS:
sudo nano /etc/ssh/sshd_config
Add or uncomment the following directive:
StreamLocalBindUnlink yes
# making the socket accessible for everyone
StreamLocalBindMask 0111
💡 What this does: This forces the VPS to automatically delete (unlink) any existing stale socket file when your internal client initiates a fresh connection, ensuring a seamless reconnect loop.
Restart your SSH daemon to apply the change:
sudo systemctl restart ssh
3. Creating the Native Systemd Service
With the VPS prepared, we build the lightweight, native systemd service on our internal client node. We leverage OpenSSH’s native ExitOnForwardFailure and ServerAlive keepalives to handle automated error termination, leaving the restart orchestration entirely to systemd.
Create the service unit file:
sudo nano /etc/systemd/system/reverse-ssh-tunnel.service
Paste the following configuration:
[Unit]
Description=Reverse SSH Tunnel via Unix Socket
After=network-online.target
Wants=network-online.target

[Service]
Type=simple
User=localuser
Group=localuser

ExecStart=/usr/bin/ssh -N -T \
    -o "ServerAliveInterval 30" \
    -o "ServerAliveCountMax 3" \
    -o "ExitOnForwardFailure=yes" \
    -o "StrictHostKeyChecking=accept-new" \
    -i %h/.ssh/id_tunnel \
    -R /home/vps_user/reverse_ssh.sock:localhost:22 vps_user@vps_public_ip

# Immediate, clean process recovery managed by Systemd
Restart=always
RestartSec=30

[Install]
WantedBy=multi-user.target
Deconstructing the Directives:
-N -T: Tells SSH to disable remote terminal allocation and interactive shell execution—forcing standard, unprivileged data forwarding mode.ServerAliveInterval 30&ServerAliveCountMax 3: The client sends an encrypted heartbeat packet every 30 seconds. If the VPS fails to respond 3 times consecutively (90 seconds total), the SSH client recognizes the tunnel is dead and terminates itself.ExitOnForwardFailure=yes: If the socket file cannot be created or bound, the client exits immediately so systemd knows to spin up a clean restart cycle instead of hanging in a zombie state.-R /home/vps_user/reverse_ssh.sock:localhost:22: The magic sequence. Instead of a remote port number, we pass a remote file path. The VPS maps incoming streams to that socket straight back to your client’s local port 22.
4. Activating the Automation
Reload the systemd manager configuration, enable the service to initialize automatically on every system boot, and fire up your new stealth link immediately:
sudo systemctl daemon-reload
sudo systemctl enable --now reverse-ssh-tunnel.service
Verify that your service is running smoothly:
Bash
systemctl status reverse-ssh-tunnel.service
If you look at your public VPS home directory, you should now see a brand-new socket file waiting for connections:
ls -la /home/vps_user/reverse_ssh.sock
# Output will display 's' as the file type descriptor (srwxr-xr-x)
5. Connecting Through the Socket (The Client Config)
Since your bastion host no longer exposes a public TCP port, you can’t connect by typing a simple -p port flag. Instead, you instruct your local machine’s OpenSSH client to connect to the VPS first, open a pipeline into the UNIX socket, and pass your credentials through.
You can automate this on your administrator laptop or workstation by editing your local ~/.ssh/config file:
Plaintext
Host reverse-ssh-target
    HostName localhost
    User localuser
    ProxyCommand ssh vps_user@vps_public_ip netcat -U /home/vps_user/reverse_ssh.sock
How to use it:
Now, connecting to your deeply buried internal network device is as simple as typing a single command:
ssh reverse-ssh-target
Your laptop will seamlessly authenticate with the public VPS, execute a secure local socket bridge via netcat, and drop you straight onto your home or homelab machine without ever exposing a single public port to the open internet. Minimal, secure, and fully native.